This tutorial was written using DAZ Studio 3, but many of the tool bars and options remain the same across multiple versions of the program. | Source
Obtaining the software:
There are a number of company offering
3d rendering services and 3D rendering programs on the market. Some of them specialize in character models (Like Poser and DAZ Studio) and some that specialize in landscapes (Like Bryce and Carrara). You can use which ever you are comfortable with, but for the purposes of this guide, I will focus on DAZ Studio. There are two versions of this program; an advanced program that you can purchase (like Poser) and a free version which can be downloaded from their website:
www.daz3d.comAt the risk of sounding like a DAZ Studio advertiser; you can often check back at their site for free downloads that work with the program.
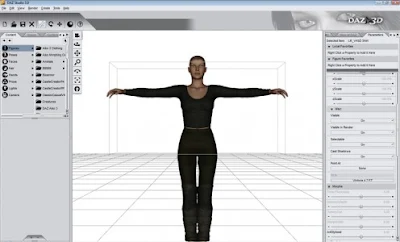
Left: Content toolbar. Center: Active scene window. Right: XYZ movement toolbar
Using DAZ Studio:
Click on the DAZ Studio icon on your desktop or in your start menu to launch the program. The first time you run the program it will ask you to register. Click on the option to register online and it will give you a free registration code for you to enter. If you receive any other pop up messages, like ones asking if a default camera is okay to use, just hit accept.
Once you’re through that, you should see an empty viewing window with two toolbars on either side. As a general rule, the toolbar on your left is for the content you have installed and the toolbar on your right is for toggling movement and sizing options for a model you have added to the scene.
Feel free to browse through your models in the left hand menu. The content is broken down into categories like “Figures”, “Props” and “Poses”: these three being the most commonly used. Under figures you will find most of the character models you download like DAZ’s Victoria and Michael series, as well as their installed clothing. Under props you will find some of the smaller accessories for outfits and environments and under poses you will find pre-set stances that you can put your character or environment into depending on what you have installed.
No one can tell you what will make a good render. How you wish to arrange a scene is entirely up to you. For my example I will put the basic Victoria model into a forest in the shadow dancer outfit. The forest and the basic Victoria model were included with DAZ Studio and the shadow dancer outfit I downloaded free from DAZ’s website. (What is available will likely change over time). Once you find a figure in the left hand menu, double click it to load it into the scene, then use the controls on the right hand menu to adjust where it is in the scene and how big it is. With people models, and some animal and environmental models, you can also adjust where the arms, legs, neck and every other joint bend. Essentially, just click on a part of the model and a new set of movement options will appear in the right hand menu.

From the menu at the top of the screen, you can find your options for rendering, loading lights and primitives and saving your most recent renders.
Note that there are two ways to select the models in the scene. You can click directly on the model in the viewing window and a grey box will outline the part you have selected, or you can click on the “Scene” tab on the left hand menu. This shows you a list of all the items currently loaded into the scene. Click on one to select it then use the parameters tab on the right hand side to adjust it.
Once you have arranged your scene, take note of where the camera is. What you’re viewing in the window is what the render will basically look like, so you want to adjust the camera to get the best possible angle. The controls for the camera can be found in the upper left portion of the viewing window.
You might also consider adding a new light source. By default, the light source is the camera, but if you want it to look like the sun is overhead, rather than wherever the camera is pointing, then you will want to add one of these. On the menu at the top, go to “Create” and “New Distant Light” or “New Spotlight”. Point light is much smaller and won’t cover the entire scene as well as the other two. (A good use for the point light is candles or simulated magic). The light you insert into the scene will be automatically selected and you can use the parameters on the right hand side to move and rotate the light until it is coming from the desired angle.
Once you are satisfied with all of these options, click on “Render” from the top menu. Depending on how powerful your computer is, a render could take anywhere from a minute to ten minutes. The basic scene I created won’t take long to render because it doesn’t involve anything too fancy. But, the more you load into the scene, the longer it will take to render. Things like shadows and reflections will also slow down render time. Once the render is complete go to file > Save Last Render and then you can save the image you just rendered to a folder where you can then share it and edit it like you would any other two dimensional picture.
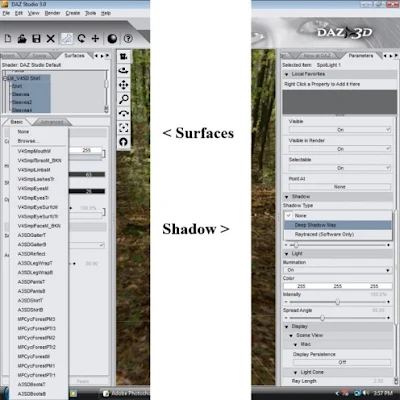
Left: Surfaces tab where you can change mats and adjust colors. Right: Parameters tab where you can activate light source shadows.
Advanced Tools You Should Know About:
The basic scene we composed above looks nice, but is missing a certain element that will really make it pop. For me, this is because of the lighting. A light source will create the proper illumination, but what will really make it look good is realistic shadows. To create these, click on your light source again. Remember, this can be done from the viewing window, or by clicking on the “scene” tab from the left hand menu (in case you can’t find the light source in the viewing window). Scroll down on the right hand menu until you reach the bottom of the parameter options. You should see an option that says “Shadow Type”. Select “Deep Shadow Map” from the drop down menu. This will increase the time it takes to render your image, but the results are very drastic. It will create all the necessary shadows from your characters and environment making everything bolder and more realistic.
The other tool you should know about is a tab in the left hand content menu. It’s called “Surfaces”. If you don’t see this tab then click on the “View” menu on the top, then “Tabs” and check off “Surfaces”. (If any tabs are missing they can be turned on in this view menu.) This tab controls what image or ‘mat’ is laid out over the 3D models in the scene. So, for example, I could exchange the skin texture of the Victoria model, for a picture of a stone surface, the result of which makes Victoria look like a stone statue. This is a really neat ability because it also lets you turn parts of props invisible, to make it look more to your liking, and lets you change the look of existing models to make them look different. Any image you have on your computer can be used as a texture for a 3D model, but depending on the picture, it may be distorted and may show the lines where it begins and ends. The best images to use are repeating textures. For my final render I changed the texture on Victoria’s shirt.
The surfaces tab also controls things like reflections and bump mapping, so it is a tool that all DAZ Studio users should learn about and play around with.
Also, from the edit menu there is an option called “Backdrop” this will let you bring in images on your computer to be used as a background for your figures. For example, if you wanted to put Victoria in a picture you took of the Grand Canyon, you could do that here. Your picture will not become 3D, but any model can be manipulated to appear as if they are in the flat picture.
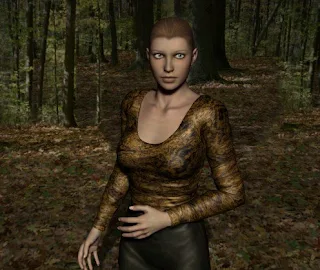
A final (basic) render.
Conclusion:
DAZ Studio is a detailed and often complex program to use. While this article, and the tutorials on DAZ’s website, can help, they barely scratch the surface. Because of this, a great deal of your knowledge will come from trial and error. It’s a fun program to play around with, so don’t be afraid to try new things. But, if you do get stuck, there is also a rich community of experienced users who are more than willing to help you with any problems you might have.
Article is originally published at
turbofuture.com by M.T.Dremer.


