Showing posts with label Technology. Show all posts

Nov 7, 2018

A Beginner's Guide to 3D Art and DAZ Studio


This tutorial was written using DAZ Studio 3, but many of the tool bars and options remain the same across multiple versions of the program. | Source


Obtaining the software:

There are a number of company offering 3d rendering services and 3D rendering programs on the market. Some of them specialize in character models (Like Poser and DAZ Studio) and some that specialize in landscapes (Like Bryce and Carrara). You can use which ever you are comfortable with, but for the purposes of this guide, I will focus on DAZ Studio. There are two versions of this program; an advanced program that you can purchase (like Poser) and a free version which can be downloaded from their website: www.daz3d.com

At the risk of sounding like a DAZ Studio advertiser; you can often check back at their site for free downloads that work with the program.
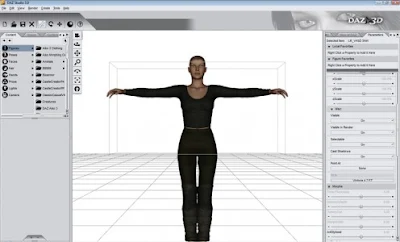


Left: Content toolbar. Center: Active scene window. Right: XYZ movement toolbar


Using DAZ Studio:

Click on the DAZ Studio icon on your desktop or in your start menu to launch the program. The first time you run the program it will ask you to register. Click on the option to register online and it will give you a free registration code for you to enter. If you receive any other pop up messages, like ones asking if a default camera is okay to use, just hit accept.

Once you’re through that, you should see an empty viewing window with two toolbars on either side. As a general rule, the toolbar on your left is for the content you have installed and the toolbar on your right is for toggling movement and sizing options for a model you have added to the scene.

Feel free to browse through your models in the left hand menu. The content is broken down into categories like “Figures”, “Props” and “Poses”: these three being the most commonly used. Under figures you will find most of the character models you download like DAZ’s Victoria and Michael series, as well as their installed clothing. Under props you will find some of the smaller accessories for outfits and environments and under poses you will find pre-set stances that you can put your character or environment into depending on what you have installed.

No one can tell you what will make a good render. How you wish to arrange a scene is entirely up to you. For my example I will put the basic Victoria model into a forest in the shadow dancer outfit. The forest and the basic Victoria model were included with DAZ Studio and the shadow dancer outfit I downloaded free from DAZ’s website. (What is available will likely change over time). Once you find a figure in the left hand menu, double click it to load it into the scene, then use the controls on the right hand menu to adjust where it is in the scene and how big it is. With people models, and some animal and environmental models, you can also adjust where the arms, legs, neck and every other joint bend. Essentially, just click on a part of the model and a new set of movement options will appear in the right hand menu.
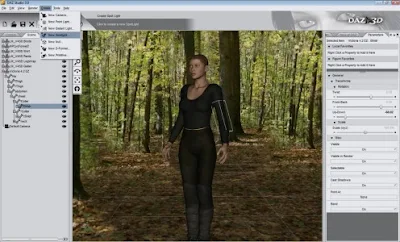


From the menu at the top of the screen, you can find your options for rendering, loading lights and primitives and saving your most recent renders.

Note that there are two ways to select the models in the scene. You can click directly on the model in the viewing window and a grey box will outline the part you have selected, or you can click on the “Scene” tab on the left hand menu. This shows you a list of all the items currently loaded into the scene. Click on one to select it then use the parameters tab on the right hand side to adjust it.

Once you have arranged your scene, take note of where the camera is. What you’re viewing in the window is what the render will basically look like, so you want to adjust the camera to get the best possible angle. The controls for the camera can be found in the upper left portion of the viewing window.

You might also consider adding a new light source. By default, the light source is the camera, but if you want it to look like the sun is overhead, rather than wherever the camera is pointing, then you will want to add one of these. On the menu at the top, go to “Create” and “New Distant Light” or “New Spotlight”. Point light is much smaller and won’t cover the entire scene as well as the other two. (A good use for the point light is candles or simulated magic). The light you insert into the scene will be automatically selected and you can use the parameters on the right hand side to move and rotate the light until it is coming from the desired angle.

Once you are satisfied with all of these options, click on “Render” from the top menu. Depending on how powerful your computer is, a render could take anywhere from a minute to ten minutes. The basic scene I created won’t take long to render because it doesn’t involve anything too fancy. But, the more you load into the scene, the longer it will take to render. Things like shadows and reflections will also slow down render time. Once the render is complete go to file > Save Last Render and then you can save the image you just rendered to a folder where you can then share it and edit it like you would any other two dimensional picture.
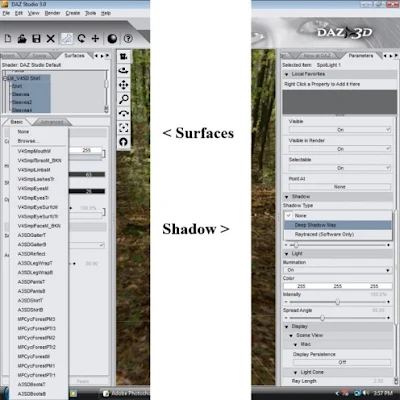


Left: Surfaces tab where you can change mats and adjust colors. Right: Parameters tab where you can activate light source shadows.


Advanced Tools You Should Know About:

The basic scene we composed above looks nice, but is missing a certain element that will really make it pop. For me, this is because of the lighting. A light source will create the proper illumination, but what will really make it look good is realistic shadows. To create these, click on your light source again. Remember, this can be done from the viewing window, or by clicking on the “scene” tab from the left hand menu (in case you can’t find the light source in the viewing window). Scroll down on the right hand menu until you reach the bottom of the parameter options. You should see an option that says “Shadow Type”. Select “Deep Shadow Map” from the drop down menu. This will increase the time it takes to render your image, but the results are very drastic. It will create all the necessary shadows from your characters and environment making everything bolder and more realistic.

The other tool you should know about is a tab in the left hand content menu. It’s called “Surfaces”. If you don’t see this tab then click on the “View” menu on the top, then “Tabs” and check off “Surfaces”. (If any tabs are missing they can be turned on in this view menu.) This tab controls what image or ‘mat’ is laid out over the 3D models in the scene. So, for example, I could exchange the skin texture of the Victoria model, for a picture of a stone surface, the result of which makes Victoria look like a stone statue. This is a really neat ability because it also lets you turn parts of props invisible, to make it look more to your liking, and lets you change the look of existing models to make them look different. Any image you have on your computer can be used as a texture for a 3D model, but depending on the picture, it may be distorted and may show the lines where it begins and ends. The best images to use are repeating textures. For my final render I changed the texture on Victoria’s shirt.

The surfaces tab also controls things like reflections and bump mapping, so it is a tool that all DAZ Studio users should learn about and play around with.

Also, from the edit menu there is an option called “Backdrop” this will let you bring in images on your computer to be used as a background for your figures. For example, if you wanted to put Victoria in a picture you took of the Grand Canyon, you could do that here. Your picture will not become 3D, but any model can be manipulated to appear as if they are in the flat picture.


A final (basic) render.


Conclusion:

DAZ Studio is a detailed and often complex program to use. While this article, and the tutorials on DAZ’s website, can help, they barely scratch the surface. Because of this, a great deal of your knowledge will come from trial and error. It’s a fun program to play around with, so don’t be afraid to try new things. But, if you do get stuck, there is also a rich community of experienced users who are more than willing to help you with any problems you might have.

Article is originally published at turbofuture.com by M.T.Dremer.

Jul 4, 2018

iPhone 4 Screen Replacement and Repair DIY

iPhone 4 screen replacement

This iPhone 4 Screens Replacement Guide is originally published at OutofWarranty.com.

iPhone 4 screens replacement is a nightmare and sadly, quite very common. It happens at one point or another; your phone slips out of your hand and the ground breaks its fall, or you accidentally knock it to the ground or worse, you accidentally sit or place something heavy on your screen. Then, you pick up the phone and your worst fears are confirmed.

Especially when it is the iPhone 4 screen or any other latest line-up, you get to think of how expensive fixing the phone would be (i.e. from the insurance plan you never probably paid for to the cost of fixing the phone at an Apple store without a discount). It gets so tiring and sometimes, all you can think of settling for is getting a new iPhone instead of spending almost the same amount in getting it repaired.

How to Replace iPhone 4 Screen

Well, this is easily solved. With just a few steps and an affordable iPhone 4 screen replacement kit, your iPhone 4 screen is fixed plus you get to do all by yourself.

Remove the two-star screws at the base of the Phone

To start the iPhone 4 screen replacement you need a star screwdriver from your repair kit. Now, getting a repair kit is quite easy and with one from Unlimited Cellular, you get to spend lesser.

iphone 4

Use the small star screwdriver to unscrew the star screws at the base of the phone just below the home button. Be careful not to drop the screws given that they are quite small. You could put them in a mini bowl.

Pull up the screen carefully with a Suction cup

suction cup

In the array of your repair kit, there should be a suction cup. Firmly place the suction cup at the lower half of the screen such that it sticks to it. In a case where your screen is completely shattered or broken in various places, you should cover your screen with one or two strips of clear tape. This is also quite effective in keeping your fingers free of injuries.

So, after making sure the suction cup is not stuck to the home screen but just the lower half of your screen, carefully pull up the cup to lift up the frame of the screen. When one part of the screen comes up, carefully remove the cup and place it on another part of the phone (preferably a corner). Pull that part up again.

To read the full article, check the link above.

May 21, 2018

Best VoIP Router Modem to Buy in 2018

This article is originally posted at 7 Best VoIP Router Modem to Buy in 2018.
Making high-quality Voice over Internet Protocol (VoIP) calls with a wireless broadband network provider instead of a conventional phone line requires a standard and configured modem router. However, since most conventional routers are not configured to accommodate and optimize VoIP traffics, the VoIP calls become frustrating with sloppy calls connectivity. Check out as we list the best VoIP router modem for areas with slow internet connections.
Now, the most important feature of a standard VoIP modem router is the Quality of Service (QoS) which allows for VoIP calls to be given precedence over the bandwidth. It is, therefore, to be noted that configuring modern day routers to the dual-band 802.11ac standard simply gives them an edge over conventional routers such that they are configured for high-speed internet connections using a robust Quality of Service (QoS).
While routers using Beamforming technology are capable handling calls quite easily, using a VoIP modem router is simply better for areas with slower internet connections or with many devices latching on to the internet. This is why we’ve picked out 7 Best VoIP router modems that would allow you make that VoIP call easily.

Oct 1, 2017

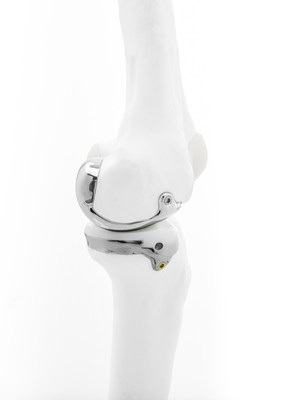
Bodycad Announces First Use of Its Unicompartmental Knee System in Patients

Bodycad has announced that the first personalized restoration procedures using its Unicompartmental Knee System in patients have been successfully performed.

Bodycad's revolutionary system is designed to optimize personalized restoration of the patient's unique anatomical features and kinematics. The system is based on proprietary 3D rendering of medical images of the patient's anatomy, resulting in a better fit and the potential for improved clinical results and patient satisfaction.

Bodycad’s Unicompartmental Knee System"The personalized restoration enabled me to perform the procedure in an exact manner with minimal bone resection," said Dr. Brian Hamlin, Co-Director of the Bone and Joint Center of Magee-Womens Hospital of University of Pittsburgh Medical Center, one of two orthopaedic surgeons to perform the procedure. "The reconstruction resulted in a well balanced knee with optimized tracking while avoiding overcorrection."

Bodycad uses proprietary imaging algorithms to produce a precise 3D image of the patient's knee. Its suite of Personalized Restoration Software enables a seamless integration of the image to implant process called the PREP (personalized restoration evaluation process). The efficient, rapid, and highly automated process is the only one of its kind in the world that is impeccably integrated between software and modern manufacturing such as 3D printing.

"I was involved throughout the production of the personalized restoration," said Prof. Werner Siebertof Vitos Orthopedic Clinic Kassel and incoming President of the German Orthopaedic Society, who also performed the procedure. "I provided patient imaging, consulted with a Bodycad PREP Tech on the resulting rendering, and then reviewed and approved the final design. The result was an exceptional fit for the patient."

"Everyone's anatomy is unique and that's why standardized implants have limitations," says Jean Robichaud, President and Founder of Bodycad. "These recent procedures reinforce a growing body of evidence that demonstrates the benefit of personalized restorations."

Earlier this year, the company received US and European clearance for its Unicompartmental Knee System and is working collaboratively with practitioners to offer this personalized approach to orthopaedics.

Source: newswire.ca

Sep 8, 2017

Evidence that new iPhones will have wireless charging

iphone

In a few weeks, Apple will challenge Samsung for smartphone dominance when it finally releases the next-generation iPhone, and rumors seem to indicate that the device — unofficially dubbed the iPhone 8 — will include wireless charging.

Now, the reputable battery and accessories company RAVpower is jumping the gun to announce what it calls the first wireless charging pad made with special technology just for "next-gen Apple devices" and tells Mashable mass production has already begun.

If this isn't considered a legitimate confirmation that wireless charging will be included in the next iPhone — I'm not sure what is. 

Chances are you probably aren't familiar with RAVpower, and we don't necessarily blame you. All you really need to know is that the company has been around since 2011 and has been making battery packs, cables, and mobile accessories ever since.

The company may not be as well-known as Anker, which was also founded in 2011 and also rose to popularity selling high-quality battery packs at super low prices, but it's every bit as legitimate. RAVpower isn’t some knockoff company cranking out iPhone accessories based on online leaks.

And if it's making wireless charging pads for the new iPhones, it means they’re spending some serious money to do so. To be wrong at this stage — mere weeks away from the official announcement — would be huge a gamble that would hurt not only the company’s finances, but its reputation.

As fast as wired charging

At first glance the $45-50 wireless charging pad RAVPower shared exclusively with Mashable looks like any old generic Qi-based wireless charger

RAVPower's new wireless charging pad that'll work with next-gen iPhones.

RAVPower's new wireless charging pad that'll work with next-gen iPhones.

IMAGE: RAVPOWER

RAVpower’s website doesn’t explicitly say the charger’s for the new iPhone 8, but the company’s general manager Allen Fung didn’t shy away from providing us with more detail when we asked. He sent Mashable the following statement (emphasis ours):

"Our sources tell us the next iPhones have special technology for wireless charging that we have in this charger. Our wireless charger will wirelessly charge the next iPhones at full speed, as well as being able to charge other mobile devices wirelessly."

Apple typically doesn't allow its partners to announce things that would hint at any of its unreleased products and forces all companies to sign strict non-disclosure agreements.

So why the heck would RAVPower shoot itself in the foot by making this announcement? Fung said it himself: His sources, which are unlikely to be Apple, but probably people close to Apple who are familiar with the schematics, have shared detailed information with his company.

We've already seen leaked images of what are believed to be Apple's own wireless charging pads, so it's definitely possible RAVPower has the inside scoop on the special tech needed to start production on them now. It's one thing to manufacture iPhone plastic cases based on leaked dimensions, but another to build accessories that require chips and controllers, and safety certifications to ensure they don't explode. RAVPower is clearly confident in the information its executives are receiving.

Leaked images of what are believed to be wireless charging pads for the new iPhones

Leaked images of what are believed to be wireless charging pads for the new iPhones

IMAGE: ZEALER/WEIBO

Independently, a source familiar with RAVPower's wireless charging pad told Mashable the "full speed" claim means the iPhone will charge up just as fast as it would when it's plugged in. It's a no-brainer that Apple would include fast wireless charging for the new iPhones since Samsung's Galaxy phones already support a similar feature.

The product's website says the wireless charging pad can deliver 10 watts of output charge and was designed to work with "next-gen Apple devices" and also supports Android devices as well. 

Let's break down what that means: A standard wired power adapter, like the one included with every iPhone, only delivers 5 watts of power. That's fine, but if you want to charge your iPhone faster, you need a power adapter that delivers more energy, like one with 10 watts or 12 watts. 

A wireless charging pad with 10 watts of output would send twice the amount of power wirelessly to next-gen iPhones. Why would it need double the output for wireless charging? 

The answer is really simple: power loss. When you're charging wirelessly, the charging pad sends the same amount of power through to the device as with a wired cable, but you lose some energy from the excess heat. That wasted power means your phone's not being juiced up at full capacity.

Wireless charging for all new iPhones

It's also important to note the careful wording for "iPhones" (plural) in Fung's statement. Fung wouldn’t elaborate further on his statement when asked, but we can use deductive reasoning to connect the dots ourselves.

For months, reports have claimed wireless charging would be coming to not just the iPhone 8, but also the revamped version of the 4.7- and 5.5-inch iPhones (tentatively referred to by leakers and media as the "7S" and "7S Plus"). KGI Securities analyst Ming-Chi Kuo, who has been extremely accurate reporting on unannounced iPhone features, was the first to report on this.

In recent weeks, we’ve seen a number of leaked images that appear to back up those claims, including dummy models with glass panels. Glass, as you might already know, is a better material for inductive charging to pass through compared to metal.

A dummy model for the new 'iPhone 7S Plus' with glass back for wireless charging

A dummy model for the new "iPhone 7S Plus" with glass back for wireless charging

IMAGE: USED WITH PERMISSION FROM DANNY WINGET/YOUTUBE

To add to all of this, famous Apple leaker Sonny Dickson told Mashable his sources have confirmed all three new iPhones will indeed have wireless charging. He also said that Apple probably won't include a wireless charger included in the box and sell it separately. Apple blogger John Gruber has also heard the wireless charger will cost extra. 

That makes sense. Samsung's flagship Galaxy phones have come with built-in wireless charging for years but have never shipped with a wireless charger in the box. 

Another prolific iPhone leaker, Benjamin Geskin, also told us he's confident Apple will introduce wireless charging for all of this year's new iPhones. Geskin has been the source of a steady number of leaks on the iPhone 8, most of which have been corroborated by other reports.

And if you're still on the fence that wireless charging will be one of the key features Apple touts at its unveil event... well, maybe this soothing new charging sound hidden in iOS 11, which could be what plays when you place a new iPhone on a wireless charging pad, might convince you it's happening.

We keep saying this every day, but this year's iPhone event is going to be the biggest ever. Not only will we get a brand new iPhone with plenty of new features, but we're also expecting some big changes to the current models. 

The latest rumors claim Apple might hold its iPhone event on Sept. 12 and launch the phones on Sept. 22. Are you shaking from excitement? Because we are. 

Source: mashable.com

Jul 21, 2017

That Million Dollar Curb Appeal for the DIY-er

This article is originally posted at smoothair.ca. If youwant to read full article, visit http://www.smoothair.ca/home/million-dollar-curb-appeal-diy-er/

April showers bring Mayflowers…or so they once said! Hopefully that English proverb holds true for ushere in the Pacific North West this spring. While it has been dreary outside,long days and warmer weather await!

But what to do with yourfront yard once the weather turns?

Right now it is useless. Itlooks tired. It looks old. The neighbours think the house is abandoned (notactually but you get the point). This spring you are going to make your yardscream modernity – and on a DIY budget no less! Now roll up your sleeves andprepare to transform your tired yard into a magnificently modern masterpiece.

Lawn TLC

The key to a beautiful house isa beautiful lawn. Spring and autumn are the best seasons for lawn repair and abag of turf builder, combined with a regiment of moss killer and weed remover,are quick and cheap options to restore that deep green hue.

Consider borrowing yourneighbour’s push-mower to get that short uniform look and do not forget to edgethe lawn. With proper edging and a close shave, you will have a fantasticlooking lawn all summer – don’t forget to water!

Plant A Tree

A regularly pruned tree ofmoderate height, say…no larger than 7 feet, can be a focal point in yourgarden. It draws eyes from the house itself and provides depth to a wellmanicured lawn that is cut both short and uniform. You can grab a juvenile treefor around $20.

Be Bold: Stain Your Cement

The world of stained cement isa marvelous one. You are only limited by your imagination…and maybe yourbudget. But I know you are a DIY master with a small pocketbook. Fear not! Thepeople over at doityourself have a wonderfulbreakdown of staining that cement, and for as little as 50 cents per squarefoot. Not bad at all!

 Accentuate with Native Shrubs

Small, upright shrubs placed instrategic areas in your front yard provide multiple benefits. Shrubbery helpsto define features by framing or highlighting them and provides privacy whenused as a hedge.

Using native vegetation isbetter because you know it can survive in your yard and requires less maintenanceover time. It can also be cheaper as you can transplant vegetation from a localforest significantly reducing the costs associated with preparing your yard(don’t snag any plants from your neighbourhood park).

Also, using native vegetationwill attract wildlife such as butterflies and birds. Local vegetation can beused to create waterwise gardens too; meaning you can havea garden that looks like a million bucks, and is environmentally friendly!

Modern Lighting for Any Budget

At this point your front yardis most likely the envy of the block. But you can really make this thing pop.Small, stainless steel bollards are a perfect accent to a well manicured yardthat can give that million-dollar curb appeal for under 100 hundred dollars.

There is a HUGE selection ofbollards to choose from, but we are going for an ultra modern aesthetic andshort, stainless steel bollards are all the rage. If you buy solar, you don’thave to pay for electricity or bury any wire! Double Bonus.

I should warn you though.Making these simple, easy changes to your front yard may cause realtors toapproach you with an offer of selling your house. That is the price a successfulDIY-er must pay for their ingenuity.

Credit to Realspace 3D forthis post.

Jul 20, 2017

The Best At Home Espresso Machine


This is article is originally post at MyEspressoShop.com - best at home espresso.
So you're finally ready to upgrade to a professional-grade espresso machine? Congratulations! We know it's a big step, so we're here to help you along the way.

Buying a high-end espresso machine is one of the best investments (if not the best investment) a coffee lover can make. Not only will it allow you to be able to enjoy real authentic espresso, cappuccinos, and 'velvety' lattes in your own home or office, but it will also allow you to save money in the process (win-win!).


We feel it's important to emphasis this point again: With a good machine, you will be able to make your own drinks at a fraction of the cost you would have to pay at coffee shops. With that being said, not all espresso machine are created equal. When you are buying your espresso machine, you want to be sure to choose the right one.

Below, we will be going over some of the different options you can choose from that are currently on the market. (Also, please note that when we say 'best', this is simply our personal opinion. Everyone has their own preferences when it comes to features and qualities they prefer in an espresso machine, so we just wanted to share some of our favorites with you!).

Best Manual Espresso Machines

La Pavoni Europiccola Manual Espresso Machine. This particular espresso machine by La Pavoni is arguably the 'top of the line' in the entire market for manual espresso machines. Not only does it feature a classic design with its inclusion of the retro press (which essentially gives you complete control over every aspect of your shot), but it also has a beautiful chrome finish to it.
The machine is completely manual, so it will take some time to get used to. You will need to practicing using it to get comfortable with the amount of pressure you need to use, as well as figuring out the right pulling technique to really get the best possible shot each and every time. Because of the manual nature of this machine, it is more recommended for those that are willing to learn, have patience, and really want full control over the entire process.
This is not the machine to purchase if you are simply looking to find one that does all of the work with the click of a button.

Best Semi-automatic Espresso Machine

The Rocket Espresso R58 Espresso Machine is by far one of the best options if you are looking at semi-automatic espresso machines. Manufactured by Rocket Espresso, the R58 has a level of craftsmanship that absolutely shines. Because it features dual boilers for both steaming and brewing, it is going to provide you with the ultimate level of control.
Along with this, it comes with a plugin PID with a large display that can provide you with the details you need to be able to change the temperature of both boilers at once. You can either utilize the included water reservoir or simply pump a constant supply of fresh water into the machine. While Rocket's R60V espresso machine is also fantastic, it's quite a bit more expensive than the R58. That's why we give Rocket's R58 machine the edge.

Best Automatic Espresso Machine

La Spaziale S1 Dream T Espresso Machine. This was a harder category to choose for, because there are many fantastic options. But the majority of us feel that the La Spaziale S1 Dream T is the number one automatic espresso machine on the entire market. It comes with a fully featured programmable touchpad and features two different boilers which will allow you to both brew espresso and steam milk at the same time.