Showing posts with label 3D rendering. Show all posts

Nov 7, 2018

A Beginner's Guide to 3D Art and DAZ Studio


This tutorial was written using DAZ Studio 3, but many of the tool bars and options remain the same across multiple versions of the program. | Source


Obtaining the software:

There are a number of company offering 3d rendering services and 3D rendering programs on the market. Some of them specialize in character models (Like Poser and DAZ Studio) and some that specialize in landscapes (Like Bryce and Carrara). You can use which ever you are comfortable with, but for the purposes of this guide, I will focus on DAZ Studio. There are two versions of this program; an advanced program that you can purchase (like Poser) and a free version which can be downloaded from their website: www.daz3d.com

At the risk of sounding like a DAZ Studio advertiser; you can often check back at their site for free downloads that work with the program.
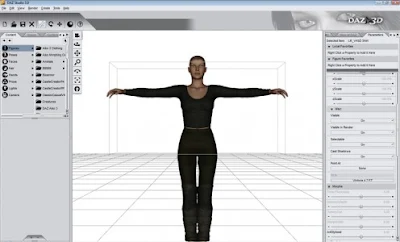


Left: Content toolbar. Center: Active scene window. Right: XYZ movement toolbar


Using DAZ Studio:

Click on the DAZ Studio icon on your desktop or in your start menu to launch the program. The first time you run the program it will ask you to register. Click on the option to register online and it will give you a free registration code for you to enter. If you receive any other pop up messages, like ones asking if a default camera is okay to use, just hit accept.

Once you’re through that, you should see an empty viewing window with two toolbars on either side. As a general rule, the toolbar on your left is for the content you have installed and the toolbar on your right is for toggling movement and sizing options for a model you have added to the scene.

Feel free to browse through your models in the left hand menu. The content is broken down into categories like “Figures”, “Props” and “Poses”: these three being the most commonly used. Under figures you will find most of the character models you download like DAZ’s Victoria and Michael series, as well as their installed clothing. Under props you will find some of the smaller accessories for outfits and environments and under poses you will find pre-set stances that you can put your character or environment into depending on what you have installed.

No one can tell you what will make a good render. How you wish to arrange a scene is entirely up to you. For my example I will put the basic Victoria model into a forest in the shadow dancer outfit. The forest and the basic Victoria model were included with DAZ Studio and the shadow dancer outfit I downloaded free from DAZ’s website. (What is available will likely change over time). Once you find a figure in the left hand menu, double click it to load it into the scene, then use the controls on the right hand menu to adjust where it is in the scene and how big it is. With people models, and some animal and environmental models, you can also adjust where the arms, legs, neck and every other joint bend. Essentially, just click on a part of the model and a new set of movement options will appear in the right hand menu.
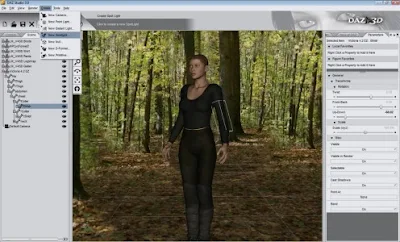


From the menu at the top of the screen, you can find your options for rendering, loading lights and primitives and saving your most recent renders.

Note that there are two ways to select the models in the scene. You can click directly on the model in the viewing window and a grey box will outline the part you have selected, or you can click on the “Scene” tab on the left hand menu. This shows you a list of all the items currently loaded into the scene. Click on one to select it then use the parameters tab on the right hand side to adjust it.

Once you have arranged your scene, take note of where the camera is. What you’re viewing in the window is what the render will basically look like, so you want to adjust the camera to get the best possible angle. The controls for the camera can be found in the upper left portion of the viewing window.

You might also consider adding a new light source. By default, the light source is the camera, but if you want it to look like the sun is overhead, rather than wherever the camera is pointing, then you will want to add one of these. On the menu at the top, go to “Create” and “New Distant Light” or “New Spotlight”. Point light is much smaller and won’t cover the entire scene as well as the other two. (A good use for the point light is candles or simulated magic). The light you insert into the scene will be automatically selected and you can use the parameters on the right hand side to move and rotate the light until it is coming from the desired angle.

Once you are satisfied with all of these options, click on “Render” from the top menu. Depending on how powerful your computer is, a render could take anywhere from a minute to ten minutes. The basic scene I created won’t take long to render because it doesn’t involve anything too fancy. But, the more you load into the scene, the longer it will take to render. Things like shadows and reflections will also slow down render time. Once the render is complete go to file > Save Last Render and then you can save the image you just rendered to a folder where you can then share it and edit it like you would any other two dimensional picture.
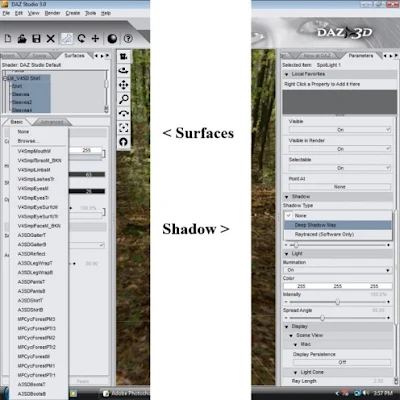


Left: Surfaces tab where you can change mats and adjust colors. Right: Parameters tab where you can activate light source shadows.


Advanced Tools You Should Know About:

The basic scene we composed above looks nice, but is missing a certain element that will really make it pop. For me, this is because of the lighting. A light source will create the proper illumination, but what will really make it look good is realistic shadows. To create these, click on your light source again. Remember, this can be done from the viewing window, or by clicking on the “scene” tab from the left hand menu (in case you can’t find the light source in the viewing window). Scroll down on the right hand menu until you reach the bottom of the parameter options. You should see an option that says “Shadow Type”. Select “Deep Shadow Map” from the drop down menu. This will increase the time it takes to render your image, but the results are very drastic. It will create all the necessary shadows from your characters and environment making everything bolder and more realistic.

The other tool you should know about is a tab in the left hand content menu. It’s called “Surfaces”. If you don’t see this tab then click on the “View” menu on the top, then “Tabs” and check off “Surfaces”. (If any tabs are missing they can be turned on in this view menu.) This tab controls what image or ‘mat’ is laid out over the 3D models in the scene. So, for example, I could exchange the skin texture of the Victoria model, for a picture of a stone surface, the result of which makes Victoria look like a stone statue. This is a really neat ability because it also lets you turn parts of props invisible, to make it look more to your liking, and lets you change the look of existing models to make them look different. Any image you have on your computer can be used as a texture for a 3D model, but depending on the picture, it may be distorted and may show the lines where it begins and ends. The best images to use are repeating textures. For my final render I changed the texture on Victoria’s shirt.

The surfaces tab also controls things like reflections and bump mapping, so it is a tool that all DAZ Studio users should learn about and play around with.

Also, from the edit menu there is an option called “Backdrop” this will let you bring in images on your computer to be used as a background for your figures. For example, if you wanted to put Victoria in a picture you took of the Grand Canyon, you could do that here. Your picture will not become 3D, but any model can be manipulated to appear as if they are in the flat picture.
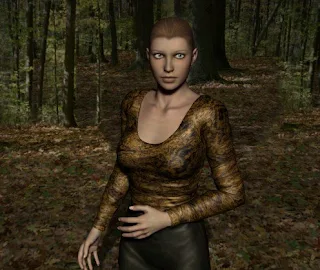

A final (basic) render.


Conclusion:

DAZ Studio is a detailed and often complex program to use. While this article, and the tutorials on DAZ’s website, can help, they barely scratch the surface. Because of this, a great deal of your knowledge will come from trial and error. It’s a fun program to play around with, so don’t be afraid to try new things. But, if you do get stuck, there is also a rich community of experienced users who are more than willing to help you with any problems you might have.

Article is originally published at turbofuture.com by M.T.Dremer.

Oct 4, 2018

3D Architectural Rendering - "Realistic Outcome"


It's very obvious that developers these days are broadly in need of realistic and highly professional visualizations to achieve marketing goals effectively. When you spend somethings on your business budget you have to think twice and remember that the appearance of your projects are detailed, and every tiny detail plays it's crucial role in selling your idea or property.

If you are having a rendering that is cheap and looks manually hand drawn, chances are the result will be completely opposite to what you wanted. Don't wade instead, make sure you present your project in the most frugal , realistic way. There are some clients that are lackadaisical when they don't like it, or they just show antipathy of the outcome.

Architectural rendering is the most popular and flexible tool being used in the planning and development of any building plans or interior spaces. There is wide variety of rendering techniques being used today that you have to knell of and one of that is architectural rendering based on 3D technology.


Advantages of 3D Architectural Rendering

Here are some uses or advantages on having a 3d architectural rendering for our building plans:

1. To advertise a far finished building structure or to visually provide clients a more realistic medium in presenting a design.

2. Completely transform the way any building or structure is conceptualized, designed, presented and sold in the residential and commercial property development sectors.

3. The uncompromising quality, accuracy in fine details, and an ability to allow multiple vantage points to be ordered at attractive costs.

4. Anodyne to the eyes of prospective clients, investors and buyers, that they can visualize the architectural design and clearly envision what the building exterior or the interior space will look like.

5. To visualize structure in most realistic way before it's built, making design and decorating choices extremely easier and more natural. You don't have to be loquacious in presenting your plan, we know that a picture costs a thousand words, however not every picture can successfully compete in today's visual communication environment and win your new client or design competition.

Architectural rendering has to be ostentatious , consist of accurate details, realistic finishes, professional landscape rendering and background, as well as lighting and shadows.

6. An invaluable tool in the planning and design process. It enables developers to sell the concept to all the important decision makers, including planners, consultants and customers.

7. Taking an aerial shot, eye level view or ground level photographic picture of existing conditions and show how your new structure or modifications simulated in 3D would look like as well as indicate material changes.

These can be most effective tools for any of your marketing materials or for architectural review board presentations. It may slightly help you as the architect to express your preliminary concepts in a very schematic and it's the most scrupulous way in presenting your design to your clients.

Architectural rendering done as 3D visualization are not that expensive these days. They are much more within reach then most of professional watercolor renderings. There's been such an explosion of computer renderings and architectural virtual walk through tours in the current decade that we can only expect further steady growth in number of architectural firms and property developers deciding to immediately benefit from what's architecture rendering industry has to offer today.

"Developers, architects and designers wants to make their life much easier on every project."


Related Articles


Article Source: http://EzineArticles.com/1624271

Jul 20, 2018

Fusion of Technology Lies in 3D Rendering and 3D Modeling

3d rendering

Gone are those days when we used to hold the pencil in our hands and spend hours in sketching up the model structure of our designs related to anything architectural. Now, we are a generation where we can see the fusion of technology which helps in 3D Rendering and 3D Modeling of various designs and making them visualize in a more creative way.

These 3D models or house rendering are used extensively by the construction and fashion world to make people see their creativity with a realistic approach like lighting's, textures, supplementary effects and colors to your landscape or buildings. Let us know what these two different terms like to tell us about their individual identity.

In the golden age, we used to have sculptors who used to build various sculptures. They also would wish to have a tool which could make their work easy and hands to rest. Well, the past has gone and the present techniques used in 3D Modeling are just amazing.

Today, software like Maya, Soft-image, 3DS Max and other software in the computer makes your work of modeling a structure easy and with proper textures and effects too. They provide you with a set of tools that help you design the model according to your imaginations but in a computer representative form.

It also has various forms like Primitive, Surface, NURBS, Sub-division and Polygonal Modeling which help in designing a model on the basis of the scenarios. Later on these models are created more beautifully by the designer with the required touch ups in a stage called 3D Rendering.
3d rendering
3D Rendering is the most sought technique used by the Engineering field in today's era because of the esthetic and practical options and effects it gives your models in a 3 dimensional form. It has created a revolution with the different angles it provides to the image along with set-ups, product modeling, animation effects and many more things.

It can be seen in various forms like interior and exterior rendering, photo-realistic rendering, material rendering or textured rendering. Each one of them has their own characteristics and they surely give you an excellent visual appeal. Interior & Exterior rendering give a day and night effect in your villa styled model along with floor plans and even water bodies. Photo-realistic rendering is the one we look forward for as it gives our villa, bungalow or company the desired look with lighting, texture and color combinations.

So, we can conclude that pragmatic strength of a human and his thoughts lay in the origin. Similarly, 3D Rendering and 3D Modeling are the roots which are responsible for the success of both, the company and the designer. It is artistic way through which he conveys the company's thoughts to lure the minds of people waiting to see something of their taste. It is kind of a communication method that leads you to win the hearts of people by adding an extra piece of vision into their imaginations.

Lastly, these are the best methods as they show the quality and professionalism of the graphics you use to give your company a chance to be noticed amongst that big crowd of people.

Article Source: http://EzineArticles.com/8049446

Jun 22, 2018

10 REASONS TO USE VRAY FOR ARCHITECTURAL RENDERING

Vray Rendering

This article is originally published at Realspace3d.com.

 Why is Vray so popular among 3D artists and why is it  Vray and Architectural Rendering work so well together? The rendering powerhouse is used to create 3D models, special effects, and graphic design. V-Ray has been the most sought-after program on the market. Although the software doesn’t retail for cheap, it has remained a popular choice for designers since its launch in 2007. This begs the question: what makes it so good?  

THE ROLE OF RENDERING MACHINES

Before we get into the skinny of the V-Ray software and its advantages, let’s go through the role of rendering machines. V-Ray rendering generates the image from a 3D model, most commonly 3ds Max.

To illustrate, imagine creating a clay sculpture. This clay sculpture acts as your 3D model. Now that you have your 3D model, you may want to share it with your coworkers right now. As you can’t bring your clay sculpture around, you take a picture with your camera. The picture of your clay sculpture is what you send to your boss or friends. The camera acts as your rendering machine.

Rendering machines and software essentially translate your model into a flat image. The latter can be printed and/or shared online—allowing you to get your ideas across. For industries that rely heavily on the software, it’s important they provide an accurate translation of their models. This is emphasized in architecture applications and design, where everything is up to scale.

V-RAY HISTORY

3D rendering software, like V-Ray, were already used in the late 90s and the early 2000s. Their applications are still the same for today: graphic design, architectural modeling, and special effects. Chaos Group, the company behind V-Ray, was a small 3D design and animation studio headquartered in Bulgaria.

In 1997, the group had to render atmospheric effects. Unsatisfied with the render plug-ins at the time, the group decided to create their own. Atmos Blender, the company’s in-house rendering engine, was created. Little did they know that would be the backbone for V-Ray, which was released to the public five years later.

Artist support was satisfactory in V-Ray’s early years for architectural rendering. However, it wasn’t until 2008 that V-Ray gained attention in artist communities. It became a software to look out for. Without missing a beat, Chaos Group released an interactive version, V-Ray RT, and the much-anticipated V-Ray Maya. The rest, as they say, is history.

V-Ray continues to be a preferred choice within professional artist circles. It has been used to create special effects in films, simulate living conditions for architectural settings, and produce hyper-realistic images.

Top 10 reasons we prefer using V-Ray for Rendering

1.) CONSISTENT PERFORMANCE

2.)   THE OPTIONS AREN’T LIMITED TO LIGHT AND MATERIALS

3.) SEAMLESS EXECUTION

4.) SYNCS ON MULTIPLE 3D MODELING PLATFORMS

5.) PERFECT FOR ANIMATING

6.) REALISTIC OUTPUTS

7.) VAST MATERIAL AND LIGHTING OPTIONS TO CHOOSE FROM—AMONGST OTHERS

8.) AN INVESTMENT TO LAST

9.) FASTER THAN THE REST

10.) THE COMMUNITY

Oct 1, 2017

Bodycad Announces First Use of Its Unicompartmental Knee System in Patients

Bodycad has announced that the first personalized restoration procedures using its Unicompartmental Knee System in patients have been successfully performed.

Bodycad's revolutionary system is designed to optimize personalized restoration of the patient's unique anatomical features and kinematics. The system is based on proprietary 3D rendering of medical images of the patient's anatomy, resulting in a better fit and the potential for improved clinical results and patient satisfaction.

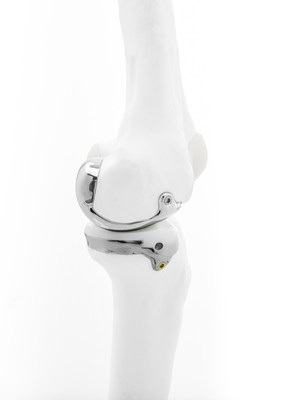
Bodycad’s Unicompartmental Knee System"The personalized restoration enabled me to perform the procedure in an exact manner with minimal bone resection," said Dr. Brian Hamlin, Co-Director of the Bone and Joint Center of Magee-Womens Hospital of University of Pittsburgh Medical Center, one of two orthopaedic surgeons to perform the procedure. "The reconstruction resulted in a well balanced knee with optimized tracking while avoiding overcorrection."

Bodycad uses proprietary imaging algorithms to produce a precise 3D image of the patient's knee. Its suite of Personalized Restoration Software enables a seamless integration of the image to implant process called the PREP (personalized restoration evaluation process). The efficient, rapid, and highly automated process is the only one of its kind in the world that is impeccably integrated between software and modern manufacturing such as 3D printing.

"I was involved throughout the production of the personalized restoration," said Prof. Werner Siebertof Vitos Orthopedic Clinic Kassel and incoming President of the German Orthopaedic Society, who also performed the procedure. "I provided patient imaging, consulted with a Bodycad PREP Tech on the resulting rendering, and then reviewed and approved the final design. The result was an exceptional fit for the patient."

"Everyone's anatomy is unique and that's why standardized implants have limitations," says Jean Robichaud, President and Founder of Bodycad. "These recent procedures reinforce a growing body of evidence that demonstrates the benefit of personalized restorations."

Earlier this year, the company received US and European clearance for its Unicompartmental Knee System and is working collaboratively with practitioners to offer this personalized approach to orthopaedics.

Source: newswire.ca

Aug 9, 2017

Luxion KeyShot 7 - Amazing Capabilities & Features

Luxion, the rendering software gurus, has announced the release of KeyShot 7, which includes updates that make the 3D rendering process faster and more awesome than ever before.

Architectural rendering 3D, Animators and engineers utilizing the KeyShot 7 engine can now look forward to a host of new features, including new material types (such as clear coat and metallic materials controls) and new texture mapping methods.

KeyShot 7 also offers new lighting controls, meaning that HDR output, new environments and a new integrated HDRI Editor with interactive Sun & Sky are all added to the 3D artist's pallet and enable the user to create renders that are so photorealistic that you might question the nature of reality itself.

Check out the image below for an example of the awesomeness of the new multimaterial capability. Looks real, right?


In addition to the rendering environment tweaks, there are upgrades to the UI and workflow as well (because everyone is on the usability train nowadays, and if you're not making things easier to use, then your product is old hat!). Consequently, the new user interface has been completely updated with new layout and hotkey customization capabilities.

Boosts to productivity come from new workflow features, including a completely new sampling method, re-tessellation, adaptive performance mode, eight new render passes and more output capabilities that are all aimed at reducing render time and letting the user get on with proper work.

"KeyShot 7 has amazing capabilities, but we were not satisfied with only adding features," said Claus Wann Jensen, Cofounder and CEO of Luxion. "Every one of these features and every improvement must consider the user's workflow from import to final render—simplifying every task, providing absolute flexibility and complete control across interface, camera, materials and lighting. With the input from our users, I'm convinced we have done that with KeyShot 7."

You can find out more about what's new from the unsurprisingly aesthetically pleasing website at this link right here.
Soure: Engineering.com